Tuesday, October 21, 2025

Install paramiko on Termux

Preparation steps:

$ apt install build-essential

$ apt install rust

Next 2 steps will prevent the error when pip tries to install pynacl for paramiko

$ apt install clang python libffi openssl libsodium

$SODIUM_INSTALL=system pip install pynacl


Now we can install paramiko using pip

$ pip install paramiko

Monday, August 11, 2025

NodeMCU v0.9 and v1.0 pins

 NodeMCU v0.9


NodeMCU v1.0


Wednesday, July 02, 2025

WSL startup and port forwarding

Create a task to run this batch at the Windows system startup

 wsl_ssh_port_forward.bat

Monday, May 05, 2025

FT232H + Adafruit Blinka + 0.19 inch OLED (SSD1306) on Windows 11

 FT232H + Adafruit Blinka on Windows 11

Windows Ver.24H2, OS Build 26.100.3915
Python 3.10.7

Download Zadig from its page: https://zadig.akeo.ie/

Plug FT232H board to Windows

Open Zadig and reinstall the driver for FT232H, follow the instructions in this page:
https://learn.adafruit.com/circuitpython-on-any-computer-with-ft232h/windows

Make sure selecting the correct device then select "libusbK", then click on "Replace Driver"

  • Driver: FTDIBUS (...)
  • USB ID: 0403 6014


Before & After replace the driver:

  • libusbK USB Devices should appear in the Device Manager


Create python virtual env then activate python virtual env

% mkdir ws_py && cd ws_py
% python -m venv .venv
% .venv\Scripts\activate.bat

Install additional libraries to check if FT232H can be recognized

% pip3 install pyusb
% pip3 install pyftdi

Then try to run this code to show the device information

>>> import usb
>>> import usb.util
>>> dev = usb.core.find(idVendor=0x0403, idProduct=0x6014)
>>> print(dev)


Now we can try to use this with the 0.91 inch OLED SSD1306 by executing the following steps

(.venv) % pip install Pillow
(.venv) % pip install adafruit-circuitpython-ssd1306
(.venv) % pip install adafruit-blinka


(.venv) % git clone https://github.com/adafruit/Adafruit_CircuitPython_SSD1306.git
(.venv) % cd Adafruit_CircuitPython_SSD1306\examples
(.venv) % set BLINKA_FT232H=1 → Always need this ENV when using FT232H(!!!)
(.venv) % python ssd1306_simpletest.py

Now we should see something drawn on the tiny display

Done.


Raspberry Pi Zero 2W + 0.91 inch OLED (SSD1306)

Playing with this cheap OLED display:
Size: 0.91 inch
Resolution: 128 x 32 pixels
Interface: I2C
Operating voltage: 3.3 V~5V
 
Update the system once:

$ sudo apt update
$ sudo apt upgrade -y

$ lsb_release -a
No LSB modules are available.
Distributor ID: Debian
Description: Debian GNU/Linux 12 (bookworm)
Release: 12
Codename: bookworm

$ uname -a
Linux pizero2w 6.12.25+rpt-rpi-v8 #1 SMP PREEMPT Debian 1:6.12.25-1+rpt1 (2025-04-30) aarch64 GNU/Linux

Setup I2C for Raspi

$ sudo raspi-config → then enable I2C communication from "Interface Options" menu
$ sudo reboot

Install I2C utilities

$ sudo apt install i2c-tools

Connect the display to raspi

Display GND →  Raspi GND pin no.5
Display VCC →  Raspi 3V pin no.1
Display SDA  →  Raspi pin no.2
Display SCK  →  Raspi pin no.3

Check if Raspi can detect the display 

$ i2cdetect -y 1 → this command should show "0x3C" address


Install the following packages for python environment:

$ sudo apt install python3-pip
$ sudo apt install python3-venv

Create python virtual environment

$ mkdir $HOME/ws_py
$ cd $HOME/ws_py && python -m venv .venv

Activate python virtual environment (current working directory is $HOME/ws_py)

$ . .venv/bin/activate
(.venv) ~/ws_py $

After python virtual environment is activated, install python packages using pip

$ pip install Pillow
$ pip install RPi.GPIO
$ pip install adafruit-circuitpython-ssd1306
$ pip install adafruit-blinka

Check if the display is working properly using example code from Adafruit

$ cd $HOME/ws_py
$ git clone https://github.com/adafruit/Adafruit_CircuitPython_SSD1306.git
$ cd examples
$ python ssd1306_stats.py

The display should show the IP address, CPU, memory and disk info of the raspberry pi after this step


Monday, April 15, 2024

Selenium on nethunter (pixel)

Make sure firefox is installed

$ firefox -V
Mozilla Firefox 115.5.0esr

Download geckodriver

$ wget https://github.com/mozilla/geckodriver/releases/download/v0.34.0/geckodriver-v0.34.0-linux-aarch64.tar.gz
$ tar xzvf geckodriver-v0.34.0-linux-aarch64.tar.gz

After this step "geckodriver" should be there

$ ./geckodriver -V
geckodriver 0.34.0 (c44f0d09630a 2024-01-02 15:36 +0000)
The source code of this program is available from testing/geckodriver in https://hg.mozilla.org/mozilla-central.
This program is subject to the terms of the Mozilla Public License 2.0. You can obtain a copy of the license
at https://mozilla.org/MPL/2.0/

Install 'selenium'

$ pip3 install selenium

Test code

import os
import sys
import logging
from selenium import webdriver
from selenium.webdriver.firefox.service import Service


THIS_DIR = os.path.dirname(os.path.abspath(__file__))
DRIVER = os.path.join(THIS_DIR, "geckodriver-v0.34.0-linux-aarch64", "geckodriver")

if not os.path.exists(DRIVER):
    print("Cannot find 'geckodriver'")
    sys.exit(1)


def main():
    print("Downloading web page...")

    s = Service(executable_path=DRIVER)

    options = webdriver.FirefoxOptions()
    options.add_argument("--headless")

    driver = webdriver.Firefox(service=s, options=options)
    
    driver.get("https://www.google.com")
    driver.save_screenshot("screenshot.png")

    print("Please check screenshot image")
    driver.quit()


if __name__ == '__main__':
    main()

After run this code "screenshot.png" should be generated

To show "screenshot.png" image in RLogin

$ sudo apt install libsixel-bin
$ img2sixel screenshot.png

Done.

Sunday, March 03, 2024

How to fix error: No module named 'apt_pkg' on Ubuntu 18.04

 Ubuntu 18.04 has python3.6.x installed but after install python3.8 and used "update-alternatives" to change the default python3 to python3.8, got the following error when running unknown command on the terminal

$ dummyyycommand  
    from CommandNotFound import CommandNotFound
  File "/usr/lib/python3/dist-packages/CommandNotFound/CommandNotFound.py", line 19, in
    from CommandNotFound.db.db import SqliteDatabase
  File "/usr/lib/python3/dist-packages/CommandNotFound/db/db.py", line 5, in
    import apt_pkg
ModuleNotFoundError: No module named 'apt_pkg'

This is caused because python3.8 cannot load "apt_pkg.cpython-36m-x86_64-linux-gnu.so"

$ cd /usr/lib/python3/dist-packages; ls -al | grep apt
drwxr-xr-x   4 root root   4096 Mar  3 22:23 apt
drwxr-xr-x   4 root root   4096 Jun  1  2021 aptdaemon
-rw-r--r--   1 root root  51576 Dec  1  2022 apt_inst.cpython-36m-x86_64-linux-gnu.so
-rw-r--r--   1 root root    227 Dec  1  2022 apt_inst.pyi
-rw-r--r--   1 root root 346784 Dec  1  2022 apt_pkg.cpython-36m-x86_64-linux-gnu.so
-rw-r--r--   1 root root   8900 Dec  1  2022 apt_pkg.pyi
drwxr-xr-x   3 root root   4096 Mar  3 22:23 aptsources
-rw-r--r--   1 root root    226 Dec  1  2022 python_apt-1.6.6.egg-info

To fix this issue:


To fix this issue just create a link named 'apt_pkg.so' points to "/usr/lib/python3/dist-packages/apt_pkg.cpython-36m-x86_64-linux-gnu.so"

$ cd /usr/lib/python3/dist-packages
$ sudo ln -s apt_pkg.cpython-36m-x86_64-linux-gnu.so  apt_pkg.so

Monday, January 29, 2024

Tmux startup script tempalte

 Tmux script template

#!/bin/bash

SESSION_NAME=dev

# new-session -c start-directory -n window-name -s session-name -t group-name -x width -y height [shell-command]
tmux has-session -t ${SESSION_NAME} 2>&1 >/dev/null

#if [ $? -ne 0 ];then
#	source /opt/.../export.sh
#	tmux new-session -s $SESSION_NAME -n main -d
#	tmux new-window  -c $SRC_DIR -n editor
#	tmux new-window  -c $BUILD_DIR -n build
#	tmux attach -t $SESSION_NAME
#	tmux select-windows -t $SESSION_NAME:0
#else
#	echo "Session is already started"
#fi
#

if [ $? -ne 0 ]; then
    # create new session
    tmux new-session -s ${SESSION_NAME} -n main -d
    tmux split-window -h
    tmux split-window -v
    tmux attach -t ${SESSION_NAME}
else
    echo "Tmux session is already created. Use 'tmux attach -t SESSION_NAME'"
fi

Friday, January 26, 2024

 Just a note.

Original post: CPU performance over time from T420 to T480


Tuesday, August 29, 2023

Convert between pandas DatetimeIndex to Python datetime:

Convert between pandas DatetimeIndex  to Python datetime:

dt_df = df_w.index.to_frame()
dt_series = df_w.index.to_series()

print(dt_df.dtypes)      # --> Date    datetime64[ns]
print(dt_series.dtypes)  # datetime64[ns]


for x in dt_df["Date"]:
    assert isinstance(x, pd.Timestamp)
    d = x.to_pydatetime()
    cw = d.isocalendar().week
    print(f"{d} - cw{cw}")


for x in dt_series:
    assert isinstance(x, pd.Timestamp)
    d = x.to_pydatetime()
    cw = d.isocalendar().week
    print(f"{d} - cw{cw}")

Friday, August 25, 2023

UGREEN M.2 SSD 外付けケース Windows 10で認識しない

UGREEN M.2 SSD 外付けケース 

  • NVME/SATA 両対応
  • USB 3.2 Gen2規格
  • UASP/TRIM対応
  • 10Gbps高速転送
  • 2230/2242/2260/2280 M key/B+M key SSD対応


上記の外付けSSDを買ったがWindows 10のPCで最初は認識されたが,あるタイミングで何らかの不具合(Blue screenやDisk access error)が発生して認識できなくなった.

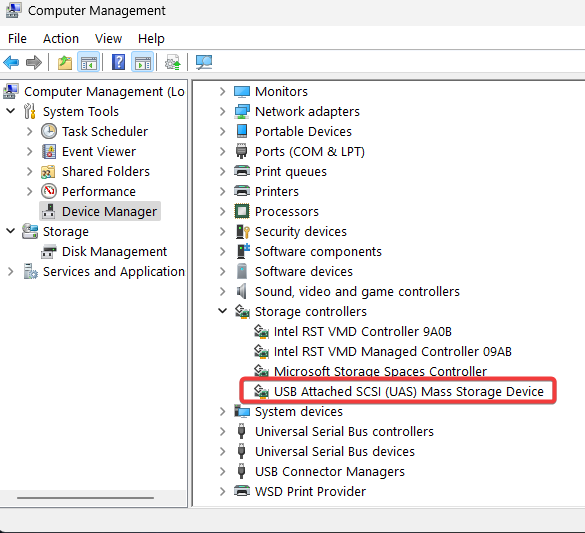
いろいろ調べた結果 認識できなかったPC(HP Zbook 15 G3)では,Device ManagerのStorage controllerで”USB Attached SCSI (UAS) Mass Storage Device”がこの問題と関係がありそうだ・・・(ここに似た問題が報告されている).HPのサポートサイトに載っている重要なドライバ更新プログラムやSSD関連のドライバをアップデートしたら認識されるようになって動作も安定になった.


Saturday, June 03, 2023

Lubuntu 20.04で日本語入力

Lubuntu 20.04 は少し古い (・・・現時点(2023年)ではかなり古い?)Distroで日本語入力の設定(fcitx-mozc)で上手く動かすことができない.おそらく繰り返してupdate/upgradeしていたが,fcitxは開発が止まっているため,不具合が出ているかもしれない・・(この記事によれば)

上記の記事に従って fcitxではなくfcitx5とfcitx5-mozcをインストールしたら上手く日本語入力ができるようになった

実施手順:

下記のコマンドで表示される古いfcitx関連パッケージをすべて削除(apt remove)

% apt search "^fcitx" | grep installed

その後,上記の記事の手順に従ってfcitx5-mozcをインストール

% sudo add-apt-repository ppa:ikuya-fruitsbasket/fcitx5

% sudo apt install fcitx5 fcitx5-mozc

後は下記のようにmozcをInput Methodに追加しCtrl + Spaceで入力を切り替えれば日本語入力できるようになる


Monday, May 15, 2023

Wireshark does not work with Tightvncserver

Using kali linux on raspberry pi 4 but wireshark does not work with tightvnc server...  According to this issue report, it's the issue with Qt 

Version of Kali linux I'm using:

$ cat /etc/os-release                       

PRETTY_NAME="Kali GNU/Linux Rolling"

NAME="Kali GNU/Linux"

VERSION="2023.1"

VERSION_ID="2023.1"

VERSION_CODENAME="kali-rolling"

ID=kali

ID_LIKE=debian

HOME_URL="https://www.kali.org/"

SUPPORT_URL="https://forums.kali.org/"

BUG_REPORT_URL="https://bugs.kali.org/"

ANSI_COLOR="1;31"

To fix this issue, changing from "tightvnc" to "tigervnc-standalone-server" and confirmed that the issue is actually fixed

Steps to install and my config:

1. Fist install "tigervnc-standalone-server"
$ sudo apt install tighervnc-standalone-server
After this step, "update-alternatives" will change the link of "vncserver" from "/usr/bin/tightvncserver" to "/usr/bin/tigervncserver"

2. Generate password
$ vncpasswd

3. Then create "/etc/systemd/system/vnc-server.service" file as below:
$ cat /etc/systemd/system/vnc-server.service
[Unit]
Description=VNC Server

[Service]
ExecStart = sudo -u kali vncserver -geometry 1440x900 :1 -localhost=0
ExecStop = sudo -u kali vncserver -kill :1
Type = forking

[Install]
WantedBy = multi-user.target

After this just enable/start the service...

Note: "-localhost=0" option is intentionally used in my environment (not secured) because I just want to directly connect to the VNC service, without using a SSH tunnel. By default this option of "tigervncserver" is "-localhost=1"


Thursday, May 11, 2023

CH341 rom programmer

 CH341 :

Driver: CH341PAR.EXE - 南京沁恒微电子股份有限公司https://www.wch.cn/downloads/CH341PAR_EXE.html

このBlogによると英語のサイトからダウンロードしたDriverを使うとうまく認識位されない(実際自分も英語のページからダウンロードしたが,やはり認識できなかった)

ドライバインストールの後,下記のソフトを使って読み出し・書き込みできる

Releases · nofeletru/UsbAsp-flash · GitHub
https://github.com/nofeletru/UsbAsp-flash/releases

Wednesday, May 03, 2023

About ESP32-S3 N16R8 DevKit (AI-S3) board RGB LED

 このAI-S3ボードをAliexpressで購入(ここ

サンプルプログラムのBlinkRGBでこのボードの上にあるRGB LEDを点滅させる.このボードのレイアウトはESP32-S3-DevKitC-1に似ているが,所々異なっている・・・探してもこのボード自体のschematicが出てこないため,RGB LEDの型番は不明,接続先も不明・・そのためサンプルプログラムがなかなか動かすことができなかった.結論からいうとこのRGB LEDはGPIO38ではなく,GPIO48で制御することができる.

オリジナルのESP32-S3-DevKitC-1schematicを見るとGPIO38に接続されているがこれはESP-IDF v5.0.1のバージョンで,ESP-IDF v4.4.xのバージョンだとGPIO48になっていた.おそらくAI-S3ボードはこの古いバージョンをベースに作られていると思われる.


環境
- Arduino IDE + esp32 v2.0.8
- Board: ESP32S3 Dev Module

サンプルプログラム
/*
  BlinkRGB
*/

#define RGB_BRIGHTNESS 150 // Change white brightness (max 255)

// Explicitly define the pin here, overwrite the one in 
// C:\Users\...\AppData\Local\
//    Arduino15\packages\
//       esp32\hardware\esp32\2.0.8\variants\esp32s3\pins_arduino.h
#define RGB_BUILTIN 48 
void setup() {
  Serial.begin(115200);
  Serial.println("setup done...");
}

void loop() {
#ifdef RGB_BUILTIN
  digitalWrite(RGB_BUILTIN, HIGH);   // Turn the RGB LED white
  delay(1000);
  digitalWrite(RGB_BUILTIN, LOW);    // Turn the RGB LED off
  delay(1000);

  neopixelWrite(RGB_BUILTIN,RGB_BRIGHTNESS,0,0); // Red
  delay(1000);
  neopixelWrite(RGB_BUILTIN,0,RGB_BRIGHTNESS,0); // Green
  delay(1000);
  neopixelWrite(RGB_BUILTIN,0,0,RGB_BRIGHTNESS); // Blue
  delay(1000);
  neopixelWrite(RGB_BUILTIN,0,0,0); // Off / black
  delay(1000);
#endif
}

RGB_BUILTINをコード内に再定義しておくことでesp32s3/pins_arduino.h内に定義されているののを上書きさせる

ちなみに,上のAI-S3ボードを購入するのであれば,下記のYD-ESP32-S3ボードを購入した方がいい.このボードのschematicはGithubにある(ここ


Tuesday, April 18, 2023

termux on Android 5.x (in 2023 ... omg)

Download old termux for Android 5.x from this site:
https://archive.org/download/termux-repositories-legacy

Used 'adb' to install:
- termux-v0.79-offline-bootstraps.apk
- termux-api-git-debug.apk
- download 'termux-api_0.47-1_arm.deb' from "https://packages.termux.dev/apt/termux-main-21/pool/main/", then transfer it to /data/local/tmp
- Use 'pkg' to install termux-api_0.47-1_arm.deb

Notes about using 'adb'

Use 'adb' to send input
- adb shell input keyevent ENTER   
- adb shell input text "which%scurl"   --> '%s' is space char

List installed packages:
- adb shell pm list package

Show installed .apk package info:
- adb shell dumpsys package com.termux

Pre-build packages for termux
- https://packages.termux.dev/apt/termux-main-21/pool/main/

Monday, March 13, 2023

tmux with git-bash

 Install tmux with git-bash (mingw64)

Download 2 pre-built packages from: https://repo.msys2.org/msys/x86_64/

tmux-<version>-x86_64.pkg.tar.zst 

libevent-devel-<version>-x86_64.pkg.tar.zst 

Download Zstd for windows (used for decompressing ZST files):  https://sourceforge.net/projects/zstd-for-windows/files/

Unzip Zstd tool then use it to extract .tar.zst files to get tar files:

zstd.exe -d <path-to-file>.tar.zst

Use 7z to unzip tmux-<version>-x86_64.pkg.tar and libevent-devel-<version>-x86_64.pkg.tar, then copy all tmux.exe and libevent related dll files to C:\Git\mingw64\bin

Done.


Wednesday, February 15, 2023

Dbus error after running Eclipse Oxygen

Error when running Eclipse Oxygen (with CDT) on lubuntu 20.04:

GLib-GIO-CRITICAL **: 16:15:43.425: g_dbus_proxy_new: assertion 'G_IS_DBUS_CONNECTION (connection)' failed

Fixed the sympthon by following command (see: here):

sudo apt purge fcitx-module-dbus


Monday, February 13, 2023

Import OVA which is created by VMWare to VirtualBox

Notes about the problem I had when trying to import OVA created by VMWare to VirtualBox...

My environment: 
  • Windows 10 pro + VirtualBox v7.0 
    • VirtualBox downgraded to 6.1.26 due to this issue with Wayland
      • Still not fixed with Wayland on old linux guest machine (kernel 2.x)
Failed to import OVA file, error when trying import OVA file (exported by VMWare) to VirtualBox:  
  • VBOX_E_INVALID_OBJECT_STATE (0x80bb0007)
OVA file is just a tar file, so extracted it using 7z, we can see these 3 files:
  • vm-disk1.vmdk: Virtual Disk file
  • vm.mf: checksum data
  • vm.ovf: OVF file, VM definition file
Use "qemu-img" to check "vm-disk1.vmdk" (need to install qemu tool to Windows ):
> qemu-img info vm-disk1.vmdk
image: vm-disk1.vmdk
file format: vmdk
virtual size: 22 GiB (23667847168 bytes)
disk size: 316 MiB
cluster_size: 65536
Format specific information:
    cid: 1377153543
    parent cid: 4294967295
    create type: streamOptimized
    extents:
        [0]:
            compressed: true
            virtual size: 23667847168
            filename: vm-disk1.vmdk
            cluster size: 65536
            format:
Probably  VirtualBox could not handle the "streamOptimized" type or compressed vmdk disk image format. 

Tried  use "qemu-img" to convert it to non-compressed disk image:
> qemu-img convert -f vmdk vm-disk1.vmdk -O vmdk vm-disk1-decompressed.vmdk
    
> qemu-img info vm-disk1-decompressed.vmdk
image: vm-disk1-decompressed.vmdk
file format: vmdk
virtual size: 22 GiB (23667847168 bytes)
disk size: 709 MiB
cluster_size: 65536
Format specific information:
    cid: 3421777080
    parent cid: 4294967295
    create type: monolithicSparse
    extents:
        [0]:
            virtual size: 23667847168
            filename: vm-disk1-decompressed.vmdk
            cluster size: 65536
            format:
Ok, now it is "monolithicSparse" and not-compressed disk image type.

Because we just created a new disk, old checksum in file "vm.mf" cannot be used so just delete this file before trying to import again

Replace the  original "vm-disk1.vmdk" with "vm-disk1-decompressed.vmdk"(or edit the "vm.ovf" to make it point to "vm-disk1-decompressed.vmdk", no need to correct the disk size information in this case)

Now try to import again "vm.ovf" and we should be able to import it to VirtualBox. After this step, we can modify the config of the imported VM (cpu numer, memory size, etc., just check the "vm.ovf" and try to set the same config)

After this step, we can run the imported virtual machine, but if you see the error No bootable medium found! System halted , you should enable the "Enable EFI" config:


Done.

Saturday, January 14, 2023

'cmake'と'ccache'を一緒に使用する方法

CmakeではCMAKE__COMPILER_LAUNCHERがあり,これを使用するとコンパイラーを呼び出す時に一緒に呼び出される 使用例: 下記のようにtoolchainファイルに書き加えて使用するか,Cmakeを呼び出す時に-DCMAKE__COMPILER_LAUNCHERで定義して実行する
set(CMAKE_C_COMPILER_LAUNCHER ccache CACHE INTERNAL "")
set(CMAKE_CXX_COMPILER_LAUNCHER ccache CACHE INTERNAL "")
この設定は,cmake 3.4から使用できる